If you’re searching for exactly how to document hail damage for an insurance claim, you’re already making a smart move and possibly protecting thousands of dollars in potential recovery. Here’s the reality most homeowners don’t hear early enough. Insurance claims are not decided by what happened. They are decided by what you can prove clearly, completely, and convincingly. After a hailstorm, everything feels urgent. You want repairs done fast. You want your home secured. You want life back to normal. That urgency often leads to rushed documentation and that’s where claims start to lose value before they even begin.
I’ve seen homeowners take a handful of photos, file a claim, and assume the insurance company will “fill in the gaps.” That rarely happens. Missing details become missed dollars. This guide is built differently. It shows you exactly how to document hail damage for an insurance claim in a way that strengthens your position from day one. If you live in storm-prone areas like Garland, this isn’t just helpful it’s critical. Let’s go deeper.
Why Documentation Matters in Hail Damage Claims
Insurance companies rely on documentation to make decisions. Not assumptions. Not verbal descriptions. Not “it looked bad.”
Evidence.
Your documentation must answer three core questions:
- Did hail cause the damage?
- How much of the property is affected?
- What is the true cost to repair or replace it?
If your documentation fails to answer any of these clearly, your claim weakens instantly.
The Hidden Gap Between Damage and Payout
Many homeowners assume visible damage equals full compensation. That’s not how it works.
Insurance carriers evaluate:
- Scope of damage (what areas are included)
- Line items (specific materials and labor)
- Justification (proof each item is necessary)
If something isn’t documented, it often doesn’t exist in the estimate. That gap between what’s actually damaged and what gets paid? That’s where most money is lost.
Strong Documentation = Leverage
When your documentation is detailed, organized, and complete:
- Adjusters have less room to question
- Estimates become more accurate
- Negotiations become easier
You’re not asking for more. You’re proving what’s already there.
Types of Hail Damage You Need to Document
Before you start documenting, you need to know exactly what counts as damage and what doesn’t.
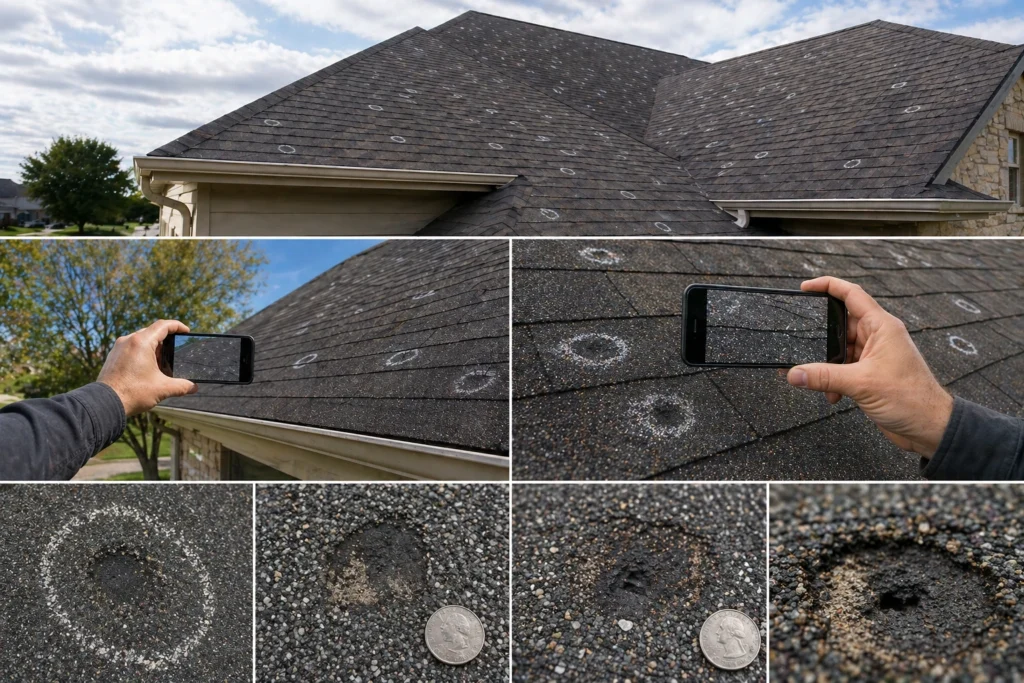
Roof Damage
This is the centerpiece of most hail claims.
Asphalt shingles:
- Granule loss exposing asphalt layers
- Circular bruising or soft spots
- Random impact patterns (not uniform wear)
Metal roofing:
- Visible dents
- Coating damage that leads to corrosion
Tile roofs:
- Cracks or fractures
- Dislodged or shifted tiles
Exterior Property Damage
Hail doesn’t hit just one area. It spreads impact across surfaces.
Document:
- Gutters (dents and distortions)
- Downspouts (impact marks)
- Siding (chips, cracks, punctures)
- Window screens (tears or holes)
- Garage doors (visible dent patterns)
- HVAC units (damaged fins and covers)
Hidden or Secondary Damage
This is where many homeowners fall short.
Hail damage doesn’t always stop at impact. It can lead to:
- Slow roof leaks
- Interior ceiling stains
- Insulation deterioration
- Mold risk from moisture intrusion
If you don’t document this early, it becomes harder to connect it back to the storm later.
Step-by-Step: How to Document Hail Damage for an Insurance Claim
Now let’s get practical. This is where your claim is built.
Step 1: Ensure Safety First
Before documenting anything, assess safety.
- Avoid climbing onto steep or wet roofs
- Watch for loose debris
- Check for structural instability
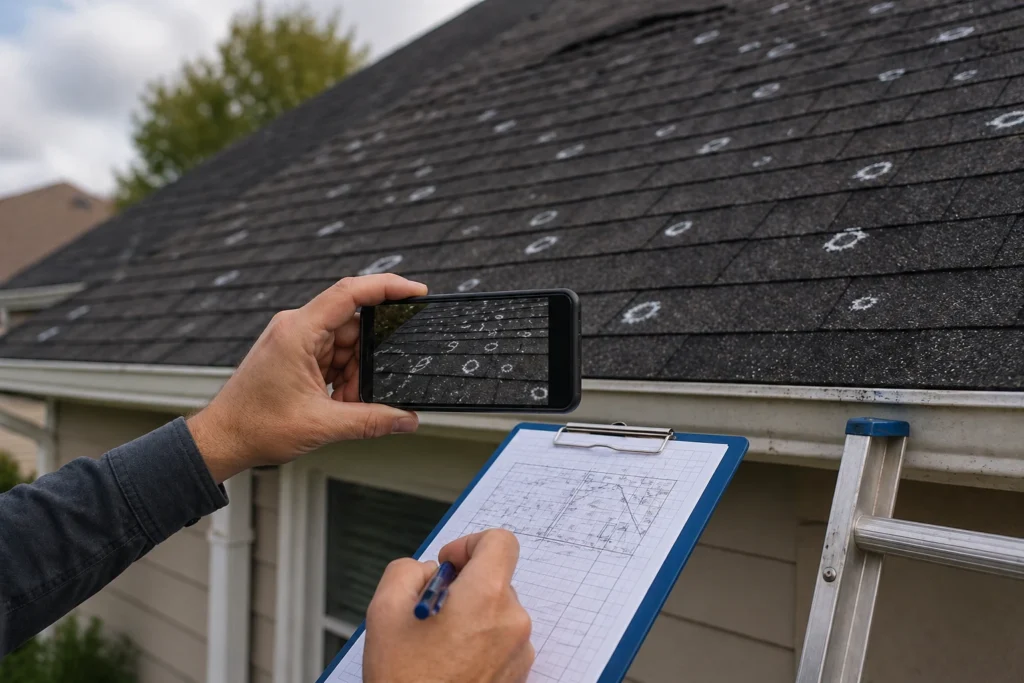
Step 2: Take High-Quality Photos
Photos are the backbone of your claim.
You need:
- Wide-angle shots
- Mid-range shots
- Close-ups
Take multiple angles of each damage point to remove doubt.
Step 3: Record Video Evidence
Photos show. Video explains.
Walk through your property and narrate:
- What you’re seeing
- Where damage is located
- How severe it appears
Step 4: Document the Date and Storm Details
Tie your damage to a specific storm.
Include:
- Date and time
- Hail size
- Weather conditions
Step 5: Create a Detailed Damage Inventory
Organize your findings clearly.
| Area | Damage Type | Severity | Notes |
| Roof | Bruising | Moderate | Replacement likely |
| Gutters | Dents | Minor | Widespread |
| Ceiling | Water stain | Moderate | Possible leak |
Step 6: Preserve Physical Evidence
Collect hailstones if possible and photograph them with a ruler. Keep damaged materials like shingles or siding.
Step 7: Gather Supporting Documents
Include:
- Roof age
- Maintenance records
- Previous inspections
- Receipts
Best Tools and Equipment for Proper Documentation
- Smartphone with good camera
- Measuring tools
- Flashlight
- Optional drone
Organization matters as much as the tools themselves.
Common Documentation Mistakes That Cost You Money
- Blurry or unclear photos
- Missing sections of the property
- Waiting too long
- Poor organization
- Relying only on the insurance adjuster
How Insurance Adjusters Review Your Documentation
They evaluate:
- Consistency
- Clarity
- Proof of impact vs wear and tear
If something isn’t obvious, it may be excluded.
How to Strengthen Your Claim with Professional-Level Documentation
- Label photos by location
- Group evidence logically
- Match damage with repair costs
- Add written explanations
This transforms your claim into a clear, structured case.
When to Bring in a Public Adjuster
Consider help if:
- Damage is extensive
- Claim feels complex
- Estimate seems low
A public adjuster strengthens documentation and negotiates on your behalf.
Local Insight: Hail Damage Trends and Claims in Garland

In Garland, hailstorms are frequent and often severe.
That leads to:
- High claim volume
- Faster inspections
- More scrutiny
Homeowners in Garland who document thoroughly consistently achieve better outcomes.
How Documentation Impacts the Supplement Process
Initial estimates often miss damage. Supplements allow additional funds but only with proof. Strong documentation makes this process smoother and more successful.
Advanced Strategy: Thinking Like an Adjuster
Shift your perspective.
Ask:
- Is this damage clearly visible?
- Is the cause obvious?
- Is the documentation complete?
Strong claims are built with clarity.
Final Checklist: Your Hail Damage Documentation System
- High-quality photos
- Video walkthrough
- Storm details
- Organized inventory
- Supporting documents
Conclusion
At its core, learning how to document hail damage for an insurance claim gives you control. Control over your claim. Your outcome. Your financial recovery. Whether you’re filing your first Hail Damage Roof Insurance Claim or refining your process, documentation is the difference-maker.
Take your time. Be thorough. Be strategic. Because in a place like Garland, where hail claims are common, strong documentation isn’t optional it’s your advantage.
Additional Insight
When organizing your documentation and evaluating patterns of damage, it can sometimes feel like piecing together a complex system almost like analyzing a concept such as Nonlinear dynamics, where small details create significant outcomes. In the same way, minor missed damage points can lead to major differences in your final claim settlement.
FAQs
As soon as it’s safe ideally within 24–48 hours to capture accurate, time-sensitive evidence.
Yes, modern smartphones work well as long as photos are clear, well-lit, and taken from multiple angles.
Document from the ground and use zoom or a drone, or consider hiring a professional inspection.
Yes, even small damage can add up and support your overall claim value.
Yes, but your documentation ensures nothing is overlooked or undervalued.
By combining photos, storm date records, and visible impact patterns consistent with hail.
Waiting too long or failing to capture complete and organized evidence.
Absolutely, especially water stains or leaks that may result from roof damage.
Yes, but incomplete documentation may reduce your payout or require additional inspections.
If your claim is complex, undervalued, or you’re unsure your documentation is strong enough.